It offered Android 2.2 Froyo (was later upgraded to 2.3 Gingerbread), a 3.2 MP auto-focus camera, a 16m color screen and was sold at $160. Intended as a budget device, the Gio has found itself in the hands of quite a few eager android users. The Android 2.3 Gingerbread version that it had is today considered to be an obsolete version. And the features it provides are considered to be much slower in performance compared to the latest versions. And it’s highly impossible that the manufacturers will take any step towards launching any further updates for Galaxy Gio. So the Gio users will feel bad to know that the new updates that are rolling out won’t be able to experience on their device. But there is an option to enjoy and experience all those devastating and unique features on your Galaxy Gio. It is only possible by using the Custom ROMs available there, which will bump up your firmware version. Install Android 4.4 KitKat CM11 ROM on Galaxy Gio S5660 Install Android Lollipop themed ROM on Samsung Galaxy Gio Many developers have been working day night to provide those unofficial Custom ROMs with the latest versions for this device. But before that, you need to root your device. If you are an advanced Android user, then you must be familiar with the rooting process. Although rooting voids the guarantee of your device, it helps to overcome all the limitations, and it’s possible to enjoy full access over the entire operating system. The main aim behind performing the rooting process is to overcome many drawbacks that a particular device has.
How to Root Galaxy Gio and Install CWM recovery
Once rooted, you can install those un-official custom ROMs running on the latest versions, replace or move the in-built system applications and settings. You can run any app which requires proper administrative permission, can also access the entire hardware itself. But before flashing custom ROMs, custom recoveries like Clockworkmod (CWM) or TWRP must be installed on your phone. With CWM, you can make full system backups, wipe data, caches, increase internal memory, increase RAM, and flash custom ROMs. It is important to note that custom recoveries are recommended to those users with rooted devices only. Here in this article, we have provided a detailed step-by-step procedure to properly root and install CWM custom recovery on your Samsung Galaxy Gio GT-S5660.
Disclaimer
The steps mentioned below are considered of many risks and may harm your device if done wrongly. If anything happens to your device while following this guide (although the chances are least), then neither the developers nor we will be held responsible for that. So we highly recommend reading and following all the given steps correctly and without any mistake.
Compatibility
Also, all the steps mentioned below must be performed only on Samsung Galaxy Gio bearing the model number GT-S5660. Better check your device along with the model number before executing anything.
Downloads
Rooting Package CWM Galaxy Gio
Pre-Requisites
Charge your device battery to at least up to 70% to reduce the chances of interruption. Once Rooted, your device will void its warranty. But if you want to regain it back, then you can do that by un-rooting the device. Enable the USB Debugging mode on your device. Download Galaxy Gio USB drivers and install them on your Windows PC. At last, backup your contacts, call logs, notes, APN settings, etc., for safety.
Steps to Root Samsung Galaxy Gio GT-S5660
Download the Rooting package on your mobile. Now switch off your phone completely. Enter your device into stock recovery mode. Hence, press and hold the Home button (Middle button) and Power button altogether until the recovery mode appears. Touch will not work here in this recovery mode. Hence, use the Volume keys for navigation and the Home button for selection. Use the volume keys and navigate to the option named ‘Update from SD card’ and select it using the Home button. As you click on it, you will view all the data located on your external SD card. Again use the volume keys to navigate to the Root Package (Update1.zip) and select it. This will initiate the Rooting process. It will hardly take a minute to complete. After that, return to the main menu of Recovery mode. Select the ‘Reboot system now’ option to reboot your device. Finally! This is how you can root your Samsung Galaxy Gio GT-S5660. You can verify that by an app named Superuser which will be installed on your phone. This will confirm that your device is rooted correctly. This Superuser app supervises each application that requires root access. Now you can view and change the system settings of your phone.
Let’s flash the CWM Custom Recovery on Galaxy Gio now.
Steps to install CWM recovery on Galaxy Gio GT-S5660
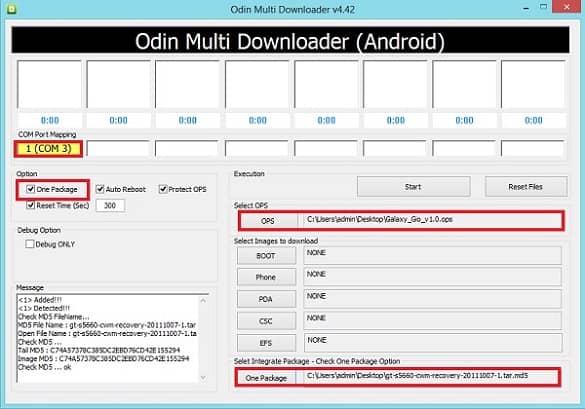
Download the CWM package given above in a specific folder on your PC and extract it. You’ll see these three files after extracting: Galaxy_Gio_v1.0.ops, gt-s5660-cwm-recovery-20111007-1.tar.md5, and Odin_multi_downloader_v4.42. Now you need to boot your device in downloading mode. For that, firstly, switch off your phone completely. Press and hold the Home button + Volume Down key + Power button. Keeping the phone in download mode, connect your phone to the computer via a USB cable. Open ‘Odin Multi Downloader_v4.42‘ from the CWM package which you have just downloaded on your PC. As soon as you open it, the ID: COM section in it will turn yellow. If it is not showing, you must check that proper device drivers are installed on your PC. On the Odin Downloader, click on the OPS tab and select the ‘Galaxy_Gio_v1.0.ops’ file from the CWM package. Then tick the ‘One Package’ option. As soon as you tick it, the One Package option at the bottom will highlight. So click that One Package option and select the ‘gt-s5660-cwm-recovery-20111007-1.tar.md5’ file. Remember not to check or un-check any other option on the Odin Multi Downloader.
Finally, press the Start button located on the Odin window to start the process. Your phone will automatically reboot itself while going through the process. It is recommended not to remove the USB cable until the process completes. Wait until the process finishes. It will hardly take 5-10 minutes to complete it. The ID: COM section will turn blue with the message ‘Pass’ below it as soon as it completes. Now you can safely remove the USB cable. If the process fails, then close the Odin window. Again go into downloading mode and repeat the entire procedure.
Conclusion
Finally! You’ve successfully rooted and installed CWM Custom recovery on your Samsung Galaxy Gio GT-S5660. You are free now to install Custom ROMs, take backup, wipe data, and much more on your device. We have made this article as simple as possible. Still, if you face any difficulty or have any problem with the above content, inform us through the comment section below. Notify me of follow-up comments by email. Notify me of new posts by email.
Δ

