Galaxy Tab P1000 stopped getting updates after Android 2.3.6 Gingerbread. However, it did receive many unofficial custom ROMs. But unfortunately, most of them had bugs and lagging issues. If you are looking for Galaxy Tab P1000 best custom ROM, your wait is finally over. Today we bring you a completely stable CyanogenMod 13 custom ROM, especially for your Galaxy Tablet. Proceed to our guide on installing the latest Android 6.0.1 Marshmallow-based CM 13 ROM on Galaxy Tab GT-P1000.
How to Flash CM13 ROM on Galaxy Tab GT-P1000
In this article, we’ll go through an easy step-by-step guide on how to install CM13 custom ROM-based Android 6.0.1 Marshmallow on Samsung Galaxy Tab GT-P1000. Let’s get started.
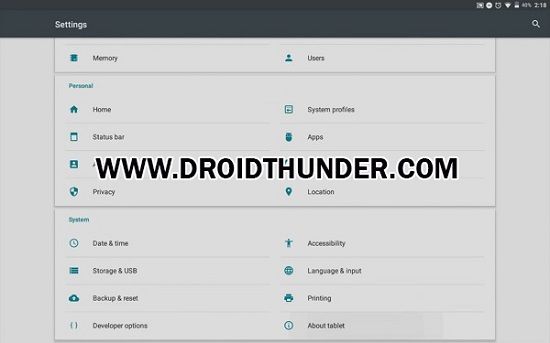
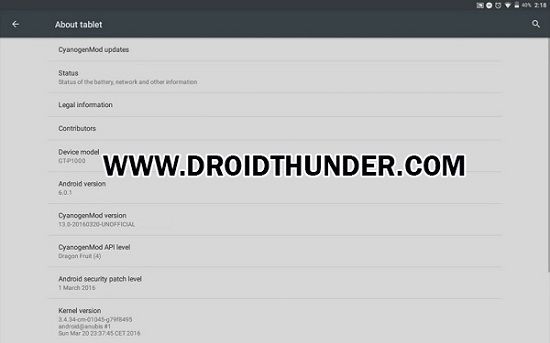
Screenshot
Disclaimer
This process is risky and might damage your tablet. Neither we at Droid Thunder nor the developers of this ROM will be held liable in any manner whatsoever for the same.
Compatibility
Install this CM 13 ROM only on Samsung Galaxy Tab having model number GT-P1000. If you try to flash this update on any other device or variant, then it might brick your tablet.
Requirements
Charge your tab to a minimum of 50%. Back up your contacts, apps, messages, call logs and notes, etc., for safety. Install Samsung USB drivers on your PC to recognize your Galaxy Tab GT-P1000 when connected using a USB cable. Root Galaxy Tab GT-P1000 and install CWM or TWRP recovery before going further. Also, backup the EFS folder present in the system directory.
That’s all! Now head on to our guide on how to install Android 6.0.1 Marshmallow CM 13 ROM on Galaxy Tab P1000.
Downloads
CyanogenMod 13 Google Apps
Steps to install Android 6.0.1 Marshmallow on Galaxy Tab GT-P1000
Power off your tablet completely. Boot the tablet into custom recovery mode. Press and hold the Volume up key + Power button till you land in recovery mode. The touch won’t work in recovery mode. Hence, use the Home button to navigate up and down and use the Search button for selection. As soon as you boot into recovery, take a Nandroid Backup. After taking a backup, select the ‘wipe data/factory reset’ option. On the next screen, press the Yes option to start the wiping process. Similarly, navigate to the ‘wipe cache partition’ option to wipe the caches. This step will clear the entire data from your tablet’s internal memory. So make sure that you have backed up everything before implementing this step. Go back to the main menu and select the Advanced option. Then, select the Reboot Recovery option. This will restart your tablet back into recovery mode. Let’s flash the CM 13 ROM now. To do so, click on the ‘install zip from SD card’ option. On the next page, select the ‘choose zip from SD card’ option. This will show you the files present on your tablet. Just select the downloaded CM 13 ROM. Next, select the ‘Yes’ option to start the installation process. Be patient and wait until the ROM installation process completes. A successful message will appear on the screen as soon as the process finishes. Similarly, flash the Google Apps (containing Google Play Store, Gmail, Google Maps, etc.) At last, restart your tablet by selecting a reboot option. The first boot will take more time to start than usual.
Conclusion
Finally! Your Samsung Galaxy Tab GT-P1000 is successfully updated to the latest Android 6.0.1 Marshmallow-based CM 13 Custom ROM. Go to Menu > Settings > About Tablet and verify the same. Enjoy the combined features of Android M and CM 13 custom ROM. Don’t forget to share your experience after using it. Notify me of follow-up comments by email. Notify me of new posts by email.
Δ Let’s flash the CM 13 ROM now. For doing so, click on ‘install zip from SD card’ option. On the next page, select ‘choose zip from SD card’ option. This will show you the files present on your tablet. Just select the downloaded CM 13 ROM. You have said to download CM13 but you have not specified to download it ONTO the tablet… How am I supposed to upload it there since the device is not being recognised at all?