Here, we’ll show you how to assemble an online shop from scratch in just a few hours. Using the eShop service provided by 1&1.co.uk, we’ll walk you through the basics of adding stock, setting up payment functions, and delivery options. Although it can be a time-consuming process, the fundamentals are easy to put in place and 1&1 provides excellent tutorial videos for the more complex elements. The service starts at around £7 per month, including your own choice of .co.uk or .com domain name. It’s a figure that means little financial risk.
How to open an online shop
Step 1: Once you’ve created an account at 1&1.co.uk, log in and from the control panel select 1&1 eShop. You’ll be taken to the design area where you can start to assemble your store. The first thing to decide is which topic best suits your business.
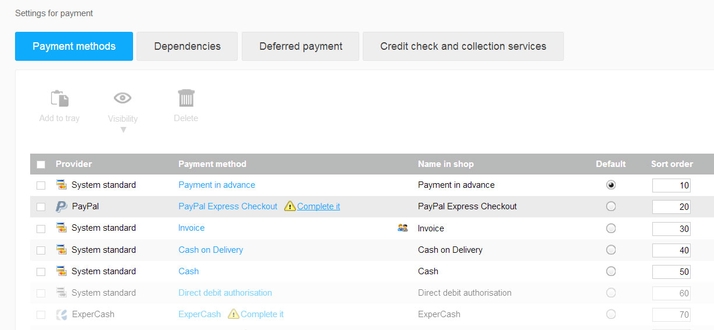
Step 2: The next stage is layout. In the left-hand column are options for where the navigation pane will go, then in the central area are the various templates available. Feel free to explore a few, as you can always change them later. Step 3: Once you’ve chosen the layout you can begin to hone the design. Each template has options for changing the background image and the colour of the header area. You can’t get at the main pane yet, so click next to continue. Step 4: Obviously your site will need a name and a way for your customers to contact you. Enter these details into the form on the next page. If you have a jpg of your company logo you can also upload it here. Step 5: If you have a VAT number then this page lets you register it with your site. On the right is also an option to use the etracker service to collect statistics about your visiting customers. It’s useful, but will cost you at least £15p/m after a trial period. Step 6: Verify all your data is correct then click Apply. Now you’ll be taken to the Administration page. Here you’ll find several video tutorials and downloadable PDFs that will explain the various options available to you. Take the time to watch a few, they’re useful. Step 7: Go to the top menu bar and select Design>Quick Design. The main options here allow you to upload Header images, change fonts, and position various elements. To edit the Category names go to Content/Categories>Datasheet View then click on the Main Category in the list and alter the title. Step 8: To change the main images and text go to Content/Categories>Content Preview. Now click on the main pane then choose Image from the top menu. Insert your own, edit the text, click OK and you’ll have a front page. You could even add an app instead for video or social media content. Step 9: To add sellable items go to Products>Products and you’ll find a database. Click Add>New and fill out the form with all the relevant information, including images. Then go to Content/Categories>Datasheet View>Products, and select the Sort option you prefer. Changing the Sort Order number also gives you a manual option. Step 10: To enable the payment facility go to Settings>Payment and you’ll see a list of payment types. Click on each to edit the account details. There are various options, from cash, direct debit, to Paypal. When the accounts are set up make sure the ‘display button at checkout’ box is ticked so your customers can use it. Step 11: The last part of the basic setup is getting the product to your customer. Click Settings>Delivery and you’ll see the available options. Clicking on one and selecting Settings allows you to input the rates for weight, speed, and even special options only available to select clients. Martyn has been involved with tech ever since the arrival of his ZX Spectrum back in the early 80s. He covers iOS, Android, Windows and macOS, writing tutorials, buying guides and reviews for Macworld and its sister site Tech Advisor.